

Chase Jarvis once said “The best camera is the one that’s with you”, and for many of us, that is our very own mobile phone camera. Not all of us own fancy cameras but I’m pretty sure most, if I dare say all, carry a mobile phone with a camera of some sort with us. Most of us, however, are quick to dismiss the cameras on our phones but we often forget that the most important component of a camera is the person standing behind it! In that same spirit, I’ll be sharing with you guys 10 tips to up your photo game using the brand new OPPO R11!

The OPPO R11 has a 16-megapixel wide-angle lens coupled with a 20-megapixel telephoto lens on the back of the phone, and another 20-megapixel camera on the front for selfies! To allow for more creativity, the phone also offers different modes: time-lapse, video, photo, portrait, pano, and even an expert mode if you want more control over the camera.
All of the following pictures were taken on the OPPO R11 without any edits.
Tip 1: Light
It’s safe to say that we’ve all heard someone say “the lighting not good”, but what defines good or bad lighting? Generally, good lighting will help your subject to shine while bad lighting can make it look ugly. For instance, taking photos under harsh direct sunlight is generally bad because of the bright highlights and harsh shadows you’ll see. Conversely, taking photos in dark places will result in poorer image quality. Generally, for food photos, we like to take them under soft dappled lighting that doesn’t give such harsh shadows. A general rule of thumb would be to sit near a window when taking photos because windows are generally a good source of light.
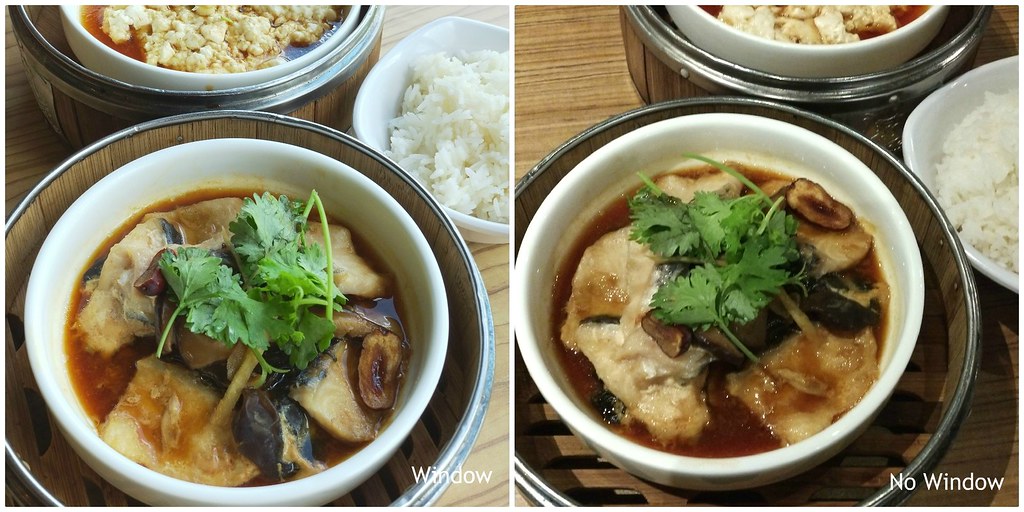
Keeping everything else except the lighting constant, above are 2 pictures of the same food – one beside a window and another right where there’s not enough light. You can definitely tell which has the poorer image quality.
Good and bad lighting can make or break a photo so make sure you evaluate the quality of the light hitting your subject before you press the shutter!
Tip 2: Fill the frame with what you want
The second thing that you can take note of is the composition of your photograph – what’s in the frame of your picture. Many a time, we are too focused on what we’re photographing, that we forget about the other less important elements in the picture.
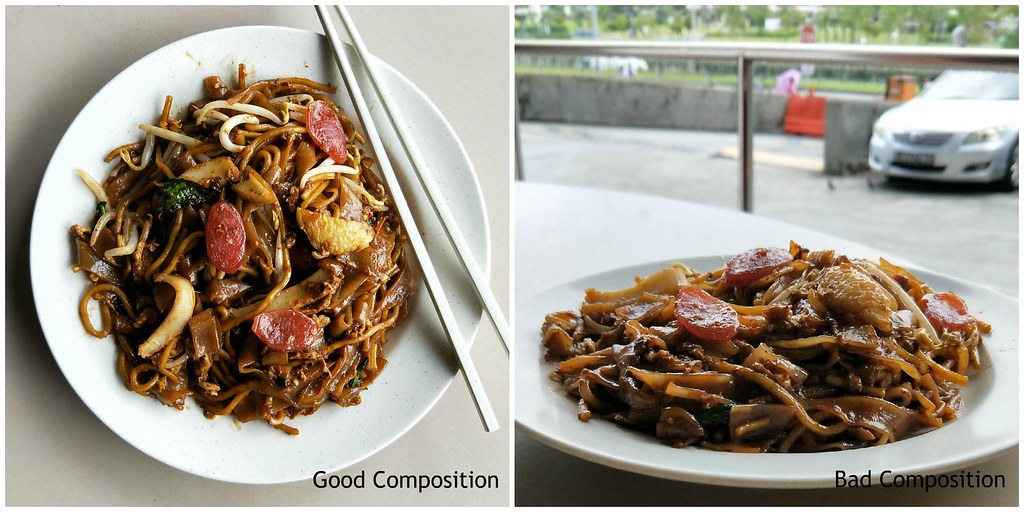
In the picture on the right, there’s a car in the background that distracts the viewer from the actual subject – your plate of char kway teow! You might also notice that the char kway teow looks rather unappetizing because the angle was a little too low. To change that, you could change the angle of the camera so that the car is not in the frame, and you can also see more of the char kway teow in your picture! I also added a pair of chopsticks to create interest in the photo.
Try experimenting with different angles and move yourself to get different compositions – you’ll be surprised at the difference that it can make. As you can tell, choosing what goes into your photo is very essential but it’s something a lot of us tend to forget, myself included. Just remember to check the background before you click the shutter button and you’ll be taking much better photos before you know it.
Tip 3: Rule Of Thirds
The rule of thirds says to split your photo into a tic tac toe board with 2 horizontal and 2 vertical lines and place the points of interest on the intersections of the lines or along those lines. This will help to create a more interesting and pleasing relationship between the elements in the photo. Studies have shown that our eye tends to go to one of the intersection points rather than the middle of the photo.
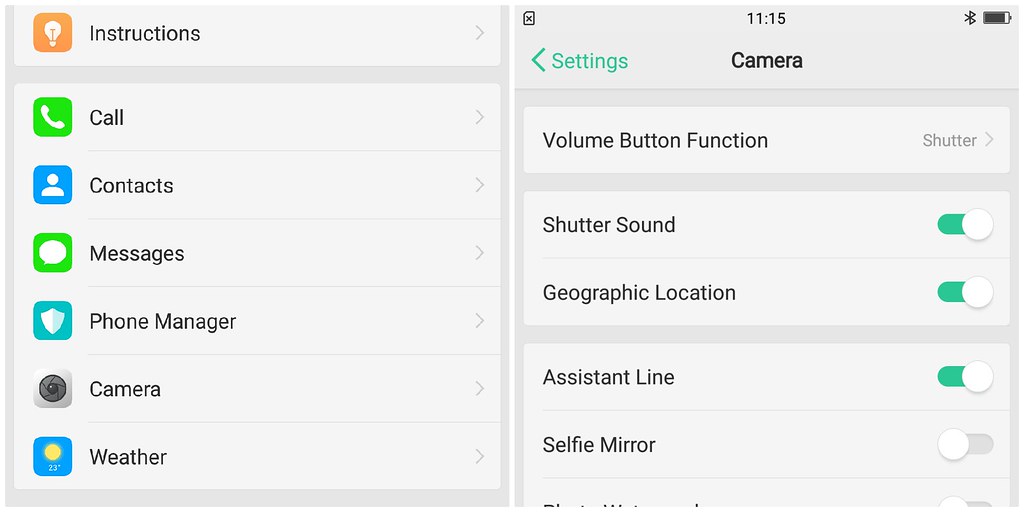
To enable the grid on your OPPO R11, simply go to “Settings” -> “Camera” -> “Assistant line” and check the box beside it.
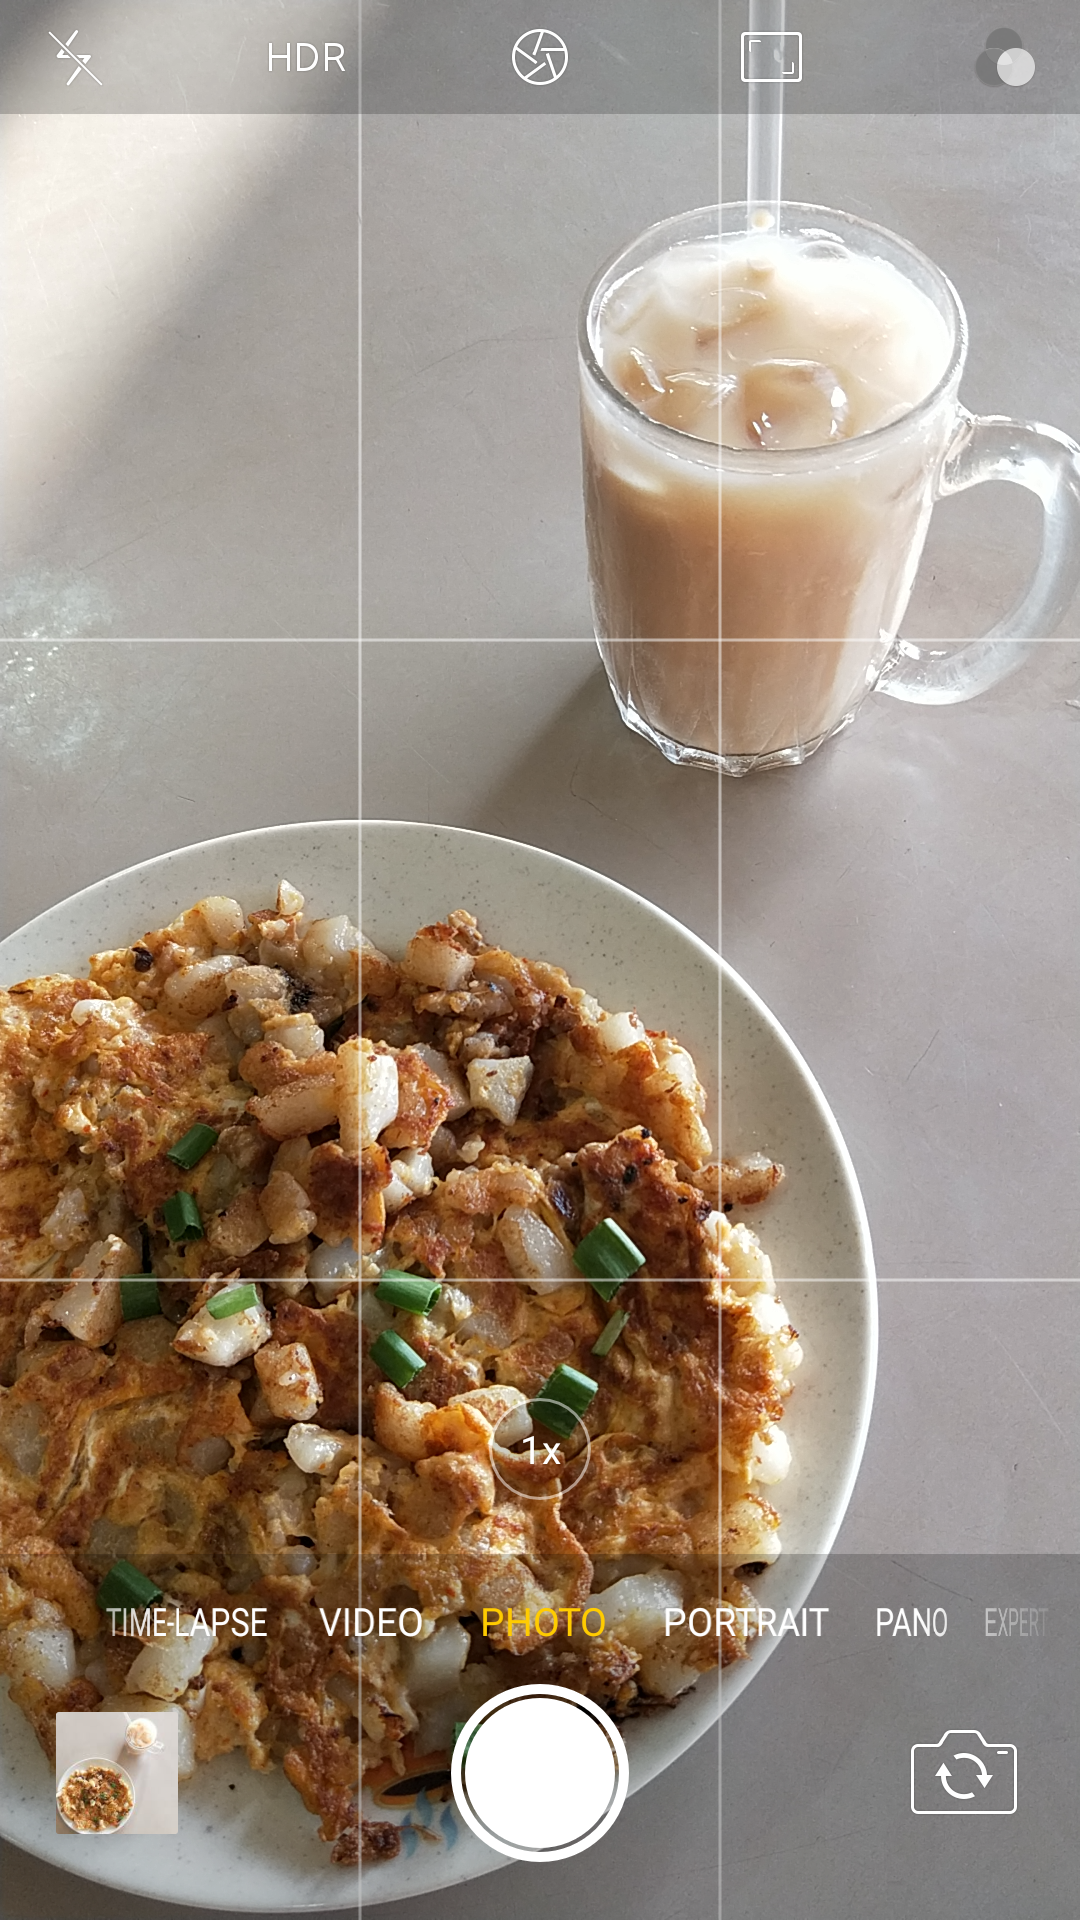
In the picture above, you can see that the grid helps you to visualize the rule of thirds so that you can easily place points of interest along those lines or the intersections. In this case, I placed my carrot cake and a cup of teh-bing along the intersections for a more visually appealing picture. Try using the rule of thirds whenever you can and you’ll be amazed at the results!
Tip 4: Pick the right lens for the job
The OPPO R11 has two cameras on the rear and here’s how you can use it to your advantage! In the expert mode, you can use each of the two lenses for different types of pictures. Use the wide-angle lens when taking a group shot to include more dishes in the frame and use the telephoto lens to get a close-up shot of a specific dish! The telephoto lens help to include less of the background in the shot, so that helps to eliminate distractions.
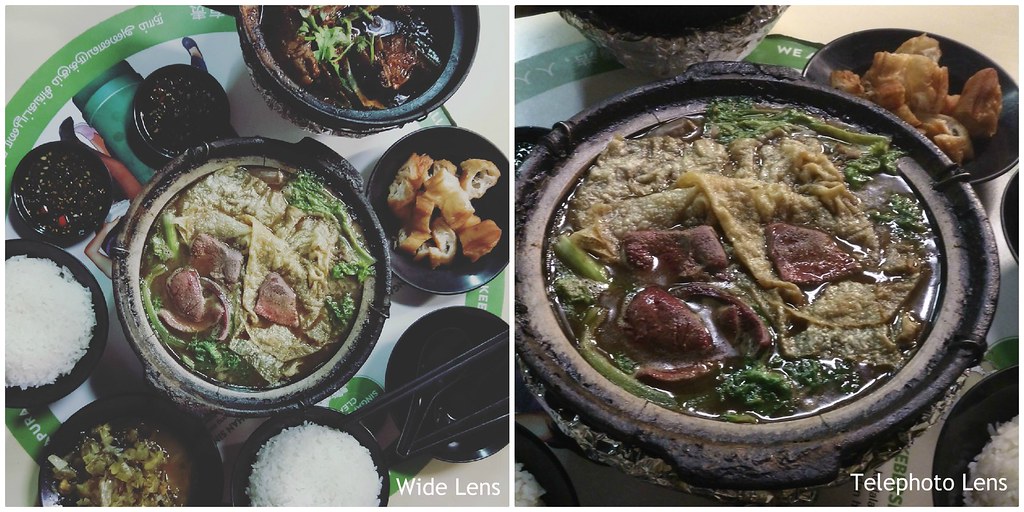
Another noteworthy point is the excellent ISO performance (how well the camera performs in low light) of both the OPPO R11’s rear cameras! Both these photos were taken along a poorly-lit street around midnight, impressive eh?
Tip 5: Tap To Focus
This is probably more of a reminder since most of us already know this, A good habit is to always tap on the screen to focus before clicking the shutter because the last thing you want is a fuzzy image. Remember to check your image before you start digging into the food!
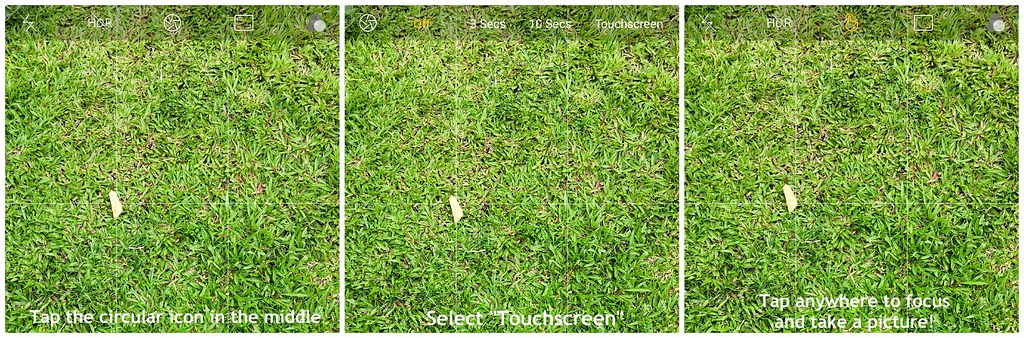
You can however, use the touchscreen mode to trigger the shutter! To do that, tap the circular icon in the middle of the top panel. Then tap the word “Touchscreen”. Once done, just frame your picture, tap on a point of interest and the camera automatically focuses on the subject and takes the picture! Now, you don’t even have to click the shutter button. Hooray!
Tip 6: Move don’t zoom
All cellphone cameras have a digital zoom function but the problem with digital zoom is that the image quality of the photograph degrades quickly as you zoom. Essentially, a digital zoom crops the image and resizes it back to normal – that’s why you’ll lose resolution very quickly as you zoom. In a sense, digital zooms are as good as cropping.
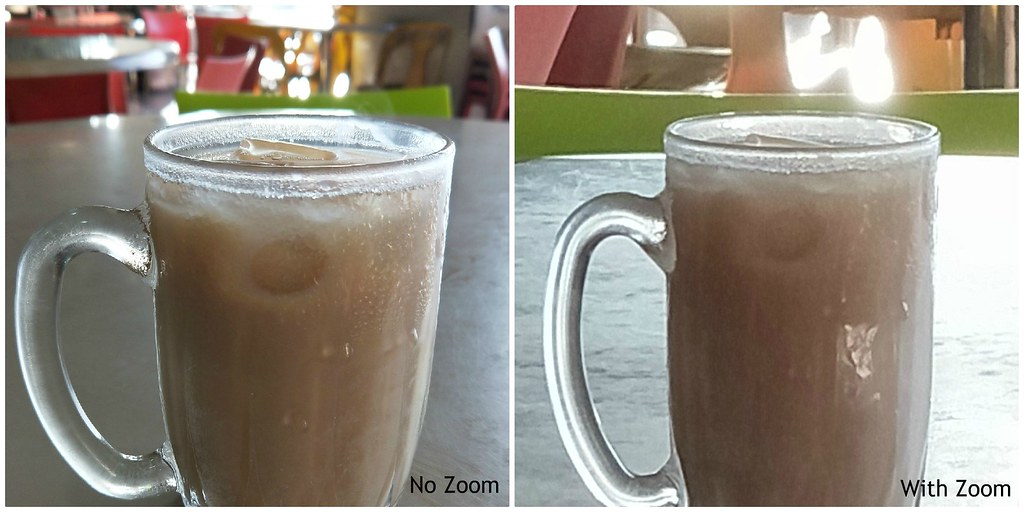
In the photo above, you can see how the image quality degrades quickly when zooming (applicable to all phone cameras). I feel that your legs are the best zoom lens in the world. Physically moving closer to your subject will always result in sharper and clearer images than cropping or zooming, period.
Tip 7: Use the virtual horizon
While it may not appeal to everybody, the use of a virtual horizon helps you to ensure that all the horizontal lines in your photos are straight. Taking a slanted photo and then tilting it back during editing can make your picture seem a little distorted and strange. Instead, using the virtual horizon helps to prevent that.
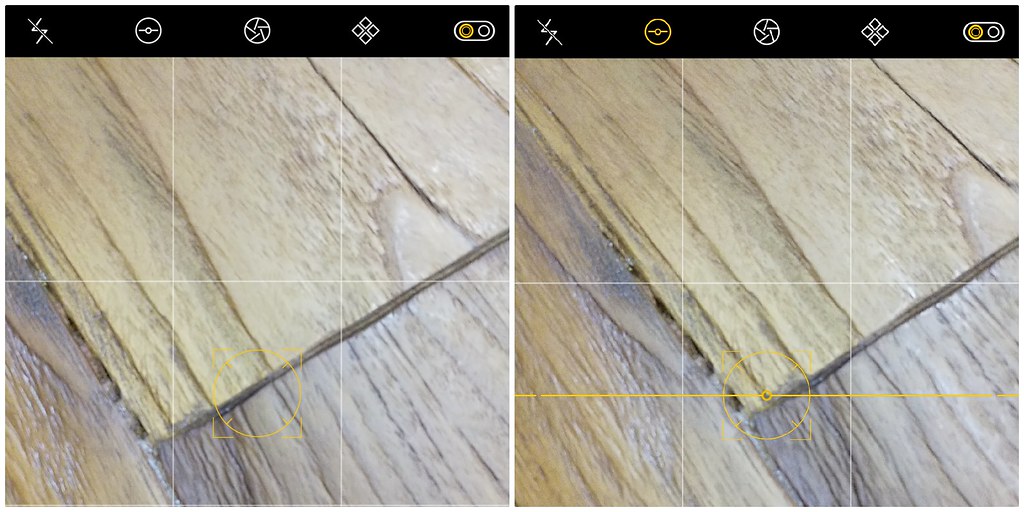
To enable virtual horizon on the OPPO R11, head to the expert mode while you are in the camera app and tap the second icon from the left of the top panel of the screen. The icon should turn yellow, when tapped, and a horizon line will appear across the phone. If you’re holding the phone straight, the line is straight but if not, you’ll see a disjointed line and you’ll have to readjust.
Tip 8: Using the depth of field
Backgrounds can define a good and a bad photograph. Busy backgrounds distract the viewer’s eye from the main subject. To alleviate that, you can make use of the portrait mode in the camera app. Tap on your subject and watch the backgrounds melt away! The purpose of this is to make the background less distracting so that your main subject can shine.
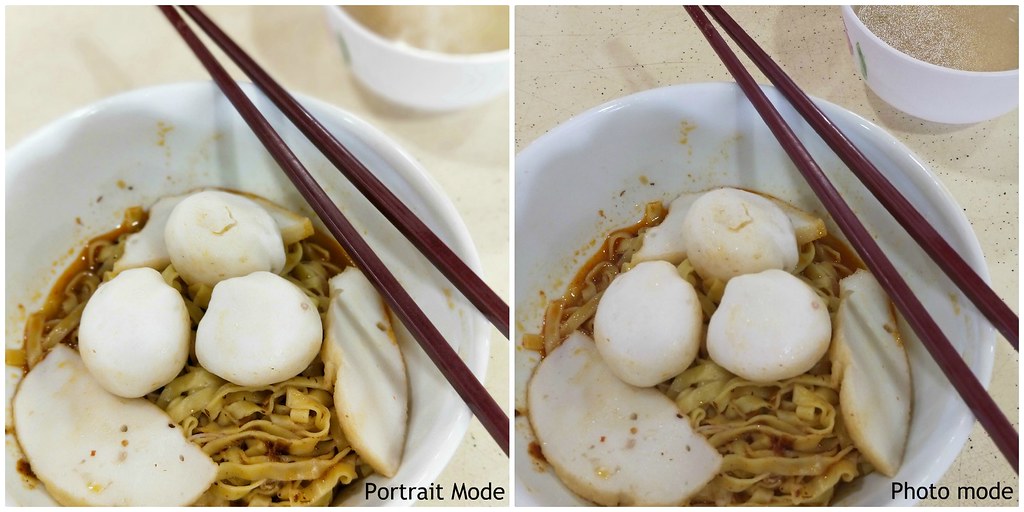
Here you can see that in portrait mode, the bowl of soup in the background is blurred out so that the focus is on the bowl of fishball noodles. This effect can be used to blur out distracting elements from the background or even to acquire a more artistic effect. Cool stuff eh?
Tip 9: Take multiple shots
While this may seem silly, this is actually a very helpful tip and one that we use. Sometimes as we click the shutter button, someone may walk into the frame or maybe the camera fails to focus. If we forget to check, we won’t realize it and the moment may be lost forever! This happens from time to time, so we highly recommend using the burst mode or just click the shutter a couple more times just as a safety precaution! You can always pick your favorite later when editing. To enable burst mode on the R11, just hold down the shutter button on the screen and you should hear a mini machine gun fire. Let go of the button once you feel like you’ve taken enough shots.
Tip 10: Edit your photos
While it’s important to learn how to compose good photos and to shoot in good light, editing your photos will give it that extra “oomph” that we all crave when we want to post them on Instagram or Facebook. We’ve done a video for you to see how we edit our photos using the in-phone application on the OPPO R11 after snapping a pic!
Bonus tip: Never use the flash unless you have to
Never use the on-camera flash unless you absolutely have no choice. The light from the on-camera flash is too harsh, hence creating harsh shadows. It also messes with the color of the pictures as you can see.
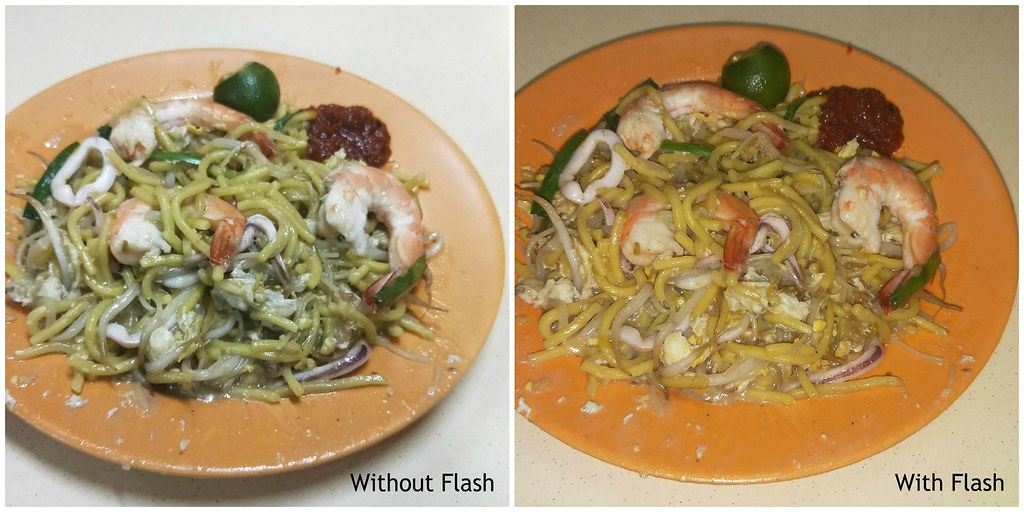
Once again, we marvel at the ISO performance of the OPPO R11’s camera. Both shots were taken at a coffee shop around 10pm! Ultimately, natural light is going to be your best bet when it comes to taking pictures. In our experience, natural light tends to offer the best results, just make sure it’s not under direct sunlight.
Overall, I find that the OPPO R11 has a very capable camera and the best part is that it’ll always be with you. Practice is key if you want to get better and hopefully these 10 tips will help you to take better photos in the future!
This post was brought to you by OPPO.